Saturday, September 11, 2010

thrifty find: {aluminum garden tubs}


Sometimes things are good just how they are.

I bought two of these aluminum garden buckets the other day at my local mini-flea market for a fabulous 2 bucks each, and I had big plans. HUGE plans. To make them even better!

I fully intended to prime them, paint them, and use them as fall planters for my front porch.

Then, I realized that for right now, I love them just how they are. A little rust here and there. A missing handle on one.

Gives a bucket character, ya know? :)

So I used them to set the stage for my recent anniversary dinner. The shiny aluminum color looks great with a huge bouquet of wildflowers,
outside...


...or inside.


Or even as an ice bucket for a bottle of bubbly!


They definitely work as rustic, outdoor entertaining accessories...so I may keep them in their original glory for just a little while longer. Later -- who knows? The possibilities for these shiny, sassy little vessels are endless!

Plus, right now I am a little sick, and inhaling spray paint fumes proooooobably not my best choice.

Just sayin'.

{Hope you are happy and healthy this beautiful Saturday!}

Thursday, September 9, 2010

cooking up romance!


As of yesterday, hubby and I have been married {three amazing years} - hurrah!
When we first met at 20-years-old, I did not cook.
Kitchens literally scared me.

After we had dated several years...I still did not cook. Unless you count rice. Lots and lots of rice.

But when we got married, at long last, at age 26....nope, still could not boil my way out of a pot.

Growing up, my mom had never shown me the womanly ways of a kitchen. She was famous for wanting to do it all herself, so whenever she was cooking she preferred us to: "Go play outside!" Now I love my mother dearly, and there were some really amazing things I gained from all that free time out exploring the world outdoors, but it also left me with zero kitchen confidence. This is what I did instead of learning to be domestic:


So three years ago, when I became the lady of my own house, I decided enough was enough. I was going to cook if it killed me. If we had to eat a year straight of burnt suppers, I would learn to cook, darnit! What was the point of having a beautiful kitchen if you don't use it?

{I love my kitchen}

So I started small. Grilling chicken. Baking salmon. Very simply. Slowly adding spices. Chopping veggies {I only chopped off part of my pinkie finger once. Small price to pay.}

Then I looked to the experts to expand my recipe base. Rachel Ray was the obvious choice: 30 minute meals? Sounds easy! Well, they still seem to take me an hour, but progress is progress, right? :o)

In no time at all I had fallen in love with cooking. I'm still no expert by any means, but I love being in the kitchen: the smells, the sounds, staging the plate and hearing the {most of the time} fantastic reviews of my handsome husband. He is pretty honest, which is helpful and finally doesn't cause me to burst into tears!

So to celebrate our beautiful 3 year landmark of love, and my transformation from kitchen 'fraidy cat, to never-make-the-same-meal-twice diva with a spatula, I decided to make an anniversary dinner!

I am not including recipes here {email me if you want details} but would rather just share my journey of creating the evening...

First I set the stage for our outdoor dinner, by adding some throw pillows and fresh flowers. Most of this bouquet was given to me by Paul when he got home from work - I just added some freshly cut lime-green hydrangeas...

{See those aluminum garden pails? I will post more on those later.}

The salad we started with is of my own creation: strawberries with goat cheese and basil. In my opinion, goat cheese is the most fantastic cheese there is. {Kind of an aphrodisiac, too. Just sayin'.} The dressing was really easy: just olive oil, balsamic vinegar, and dried basil whisked together.

{Salads are strangely my favorite thing to make}


The main dish was seafood, of course. We both adore fish of any kind, so I went with a simple dish of what I like to call drunken shrimp and scallops {aka shrimp and scallops sauteed in a wok with veggies and white wine} Mmmmm...

Add a little bubbly, some freshly-baked {I mean warmed in the oven} rosemary-olive oil bread, and you have yourself a sweet, simple, romantic meal.


Oh, and dessert was...Oreos and milk! {I still do not bake.}


PS: I love learning new recipes {especially healthy and simple ones!} so if you have one you think even a novice cook like me could handle, please share, ladies!
Bon apetit!

Tuesday, September 7, 2010

{bad spider ju-ju}


The other day I opened up the rickety old window in the laundry room at the back of our house, expecting to see a beautiful fall day.

I raised the bamboo shade {hiding the old window's ugliness} and was aghast at all the spiderwebs. So I thought to myself, "Self, you need to clean this window." So I opened up said window and immediately a huge spider literally jumped at me! I shrieked as it landed on the floor, batted away by my karate-chopping hands, and crawled towards the corner of the room at lightning speed.

I heard my hubby's calm voice from the living room: "What is it?" He did not seem particularly alarmed. Apparently my shrieking is commonplace in our house.

"Sp-sp-sp-spider. Biiiiiig spider. Come kill it."

I don't have much love for insects. I know, I know, the whole circle of life thing. I get it. As long as they are outside I am perfectly comfortable with insects. Inside my house is a whole other ballgame. The death penalty is liberally given out to trespassers of the creepy-crawly kind. So hubby killed it. Bad idea. Karmically speaking.

This brings me to my bad spider ju-ju. I now have a huge spider in my garden that will not leave. I have garden-hosed this sucker down five times, yet my yellow coreopsis plant is where he wants to live! He spins his web over, and over, and over...

Finally I gave up trying to hose him. His will is stronger than mine. I decided we could cohabitate in the garden together. Here is my little spider friend:

I kind of feel nauseous even looking at these pictures. Also like there might be something crawling on me.

As long as he stays in his little space of the garden we will get along just fine. Right???

The moral of this story is: killing insects rather than kindly releasing them out into the wild may come back and bite you. Not literally. Right?
Yeeeeeesh.

Monday, September 6, 2010

stolen style: {chalkboard basket}


Okay...I almost feel guilty about how easy this was to steal.

The idea, I mean. :o)

My thievery began at Target yesterday {do Target and Lowe's have some sort of conspiracy against my wallet?} where, as always, I thought I would take a little stroll through the Smith and Hawken aisle. You know, just to look.

No. I'm lying. I went there with a single-minded purpose: to buy this basket with chalkboard plates for 39.99. Love! I had a million ideas whirring in my head for this baby:

Guest bath: filled with towels with the words {guest} or {welcome}

Dining room: filling it with wine bottles with the word {vino}

Office: all my magazines in it with with either {ideas} or {inspiration}

My thoughts were then interrupted by a voice inside my head, saying: Should you be spending forty bucks on a basket when you have student loans to pay off?

(Sounded vaguely like Dave Ramsey. Weird.)

Another voice said: Is that in your cash budget?

(That voice was my husband. Or Dave Ramsey. Their voices are running together these days. Creepy.)

I realized that to have this basket, stay within my budget, and silence the voices, I would have to get creative. Sorry Target...I love you...but this basket is not worth forty chucks when I can easily make one myself for shockingly less.

Here is the how-to:

1. Go to a craft store and buy a small, thin, pre-cut wood piece (about $1.99) and a can of chalkboard spray paint (I got mine for $2.99 on clearance at Michaels.)

2. Drill two small holes on each side of the wood piece and sand it smooth.

3. Spray two coats of chalkboard paint on one side of the wood piece, making sure to get the sides. (I did not spray the back in case it would not stick to/get paint on my basket.)

4. Fun part: find a basket you love! You can do this project with any basket. I chose a big one similar to the Target beauty. I chose this one from Home Goods because it has some darker colors woven into it, making it a little more versatile:

5. Twist the end of a natural-colored piece of kraft ribbon and run it through one of the holes on your newly painted chalkboard piece. Do the same to the other side.

6. Position the chalkboard where you want it on your basket (this is super easy to re-do if you change your mind!) and feed the kraft ribbon through into the basket. Tie a double knot on each side and cut off any excess ribbon.


7. Another fun part: what word will you write?

In the spirit of the cool weather coming up, I decided to use my basket to store cozy spare blankets in the living room. I went with...


This project took about 20 minutes. Cost less than $20. No guilt, all pleasure. Plus, you know I will be using that chalkboard paint again...


Hope the voices in your head are telling you only sweet things -- Happy Tuesday!

Sunday, September 5, 2010

fall=football


Fall is here! Finally! I don't know about you, but for me the cool, crisp air that has finally blown in has me in the mood for all things fall: cozy sweaters, pumpkin spice lattes, leaves crunching under your {cute} boots, lugging out the fall decor and getting the warm fuzzies while putting it out again, sunflowers...and...dare I say it...
football!

Saturday hubby and I went to our first college football event of the fall season, and it was nice to get out among the crazy-obsessed {lovingly said} fans and root for the Kentucky Wildcats. This game happened to be at rival school University of Louisville. This blogger doesn't hate, though. I still found some pretty shots of said team's school. Like this one:


The weather was cool, sunny and gorgeous. I can still smell the sweet scent of charcoal grills wafting through the air...


Clad in blue we were obviously the minority at this game, but we still managed to make some friends..


...or maybe not...
{I talk a lot of smack.}


Whoever your team is, be it college or NFL, I hope your football season has started off right. Like ours did. With a WIN!

Oh, and if you are not a football fan...go get you some pumpkin spice latte. :o)


Thursday, September 2, 2010

1, 2, 3 {canister redo!}


Disclaimer: I am not crafty.
I am not even particularly thrifty.
I am a "see something cute and buy it" girl.

My story begins while perusing Target the other day, when I saw some kitchen canisters on display that made my heart skip. They were white ceramic, with white ceramic lids, and black numbers painted on the front: 1 2 3.

I thought they were really cute and simple and would look darling in my kitchen, and before I knew it I was plopping them into my red basket. Then my brain caught up with my impulse-shopping heart, and I saw the price tag. The three sizes ranged from $12-$20. I realized my cash-only budget would not allow this splurge.

{Darn you, Dave Ramsey! Just kidding. I love you.}

Then the wheels in my head really started turning (almost audibly: creak, creak, creak...) and I looked at the canister and thought: This can't be that hard to replicate. Even a DIY-dummy like me might be able to do it!

So off I ran to the thrift store and scanned the shelves in the kitchen items section for eligible candidates. After eliminating several hideous doozies , I found these:

No idea what year they are from, but I could see potential. Simple white ceramic, with metal lids and removable hardware. Oh, and how much did I pay?

79 cents each!!! I had died and gone to thrift store heaven. So to recreate my coveted Target canisters, here is what I did:

1. Removed the silly stickers from the fronts. Easy.
2. Unscrewed the hardware from the lids. Despite the rust: Easy!


3. Washed the canisters and lids to start off clean!


4. Painted the lids. I actually loved the copper color of the lids, but my kitchen has not one speck of copper in it, and they were uber-rusty, so I whipped out my magical can of black spray paint and sprayed them a lovely classic black, hiding any rust. Luuurve spray paint.


5. Added new silver knobs to the lids -- to go with my stainless-steel-clad kitchen. Used a Home Depot gift card I stole from my hubby, so they were sort-of free. :o)

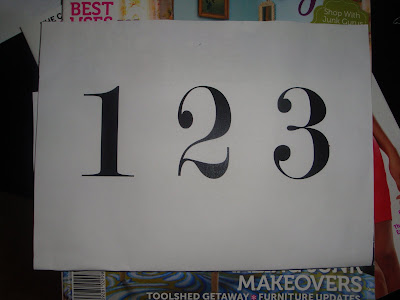
6. Chose a font style on my computer {American Typewriter} and printed out the numbers. I actually printed them each on a separate sheet, but you get the idea.

7. Used a craft knife to {very carefully} cut out the numbers. As I said, I am neither patient or good with details, so this was the crappiest part of the process for me...


8. Placed the number stencil where I wanted it on the canister, then taped it in place.

9. Next I spray-painted the numbers outside in the grass with a drop cloth. When I removed the stencils I was a little concerned -- it looked a little scary!


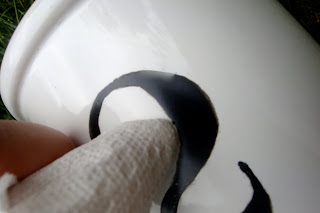
So before I had a panic attack I touched up the white spots with a q-tip full of spray paint, and then used my fingernail wrapped in paper towel to meticulously touch-up the numbers and wipe away the excess paint.


This


was


agonizing....


I couldn't get them to be perfect, but I decided a little imperfection never hurt anything. I still think they are fabulous and worth the time, effort, warm-and-fuzzy sense of accomplishment. I spent about 1 1/2 hours working on these canisters. I spent less than $3. Cash {thank you Dave Ramsey.}

My thrift store canisters went from this:

To my black and white, modern version:


Now where shall I put them?

Decisions, decisions, {fun} decisions!

Wishing you thrift-store dreams, and a very lovely almost-Friday!

PS: I am linking this to another sweet blog called House of Thrifty Decor -- check out her "Show Off Sunday Party" for more lovely ideas!

Monday, August 30, 2010

finding center


"In Nature, nothing is perfect, and yet everything is perfect."
Alice Walker

Have I mentioned I love flowers? Okay, well, if not, I will tell you right now that yes, I do love them. Smelling them, planting them, receiving them, photographing them...it might be a little obsessive how much I love them.

So the setting for my friend Kristina's wedding ceremony this past weekend had my heart a-flutter: The Athens State Botanical Gardens. As I walked around before the ceremony I couldn't help being inspired by the peaceful vibe of the gardens. It helped calm my mind from the "oh crap I have to go back to work tomorrow" reality that was setting in. So, despite the fact that my hair was frizzing, and I was sweating profusely in the Georgia heat, I managed to snag a few photographs that will hopefully inspire you as well...


Green is probably my favorite color in wildflowers...it is unexpectedly vibrant, especially with this magenta heart.


This bright red array made me think of flames in a fire.

Enormous hot-pink blooms added some tropical flair.

I was alone on my stroll...except for the bees!

The meditation garden made me want to sit yoga-style and say om...but my dress and high heels wouldn't allow it.
After my walk through the gardens I felt, albeit sweaty, a lot more centered, and ready to head back to reality after a really fun wedding weekend. Back to working overnights for this girl!
Outrageous amounts of coffee, deathly pallid skin, strange "dinner breakfasts..."

Bring it on.

Ommmm.

:o)