Showing posts with label bathroom. Show all posts

Tuesday, June 20, 2017

renovation diary : master bath // before + after

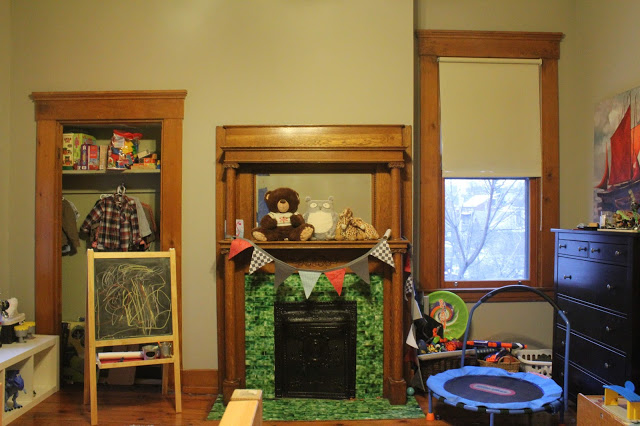
Once there was a really, really dark bedroom.  
Dark walls, dark trim, and dark tile on the dark, empty fireplace.
  
Six years ago, when we purchased our 1859 Greek Revival fixer-upper, we saw this room attached to our bedroom as a temporary spot for our firstborn (then a one-year-old) while we renovated the rest of the house.

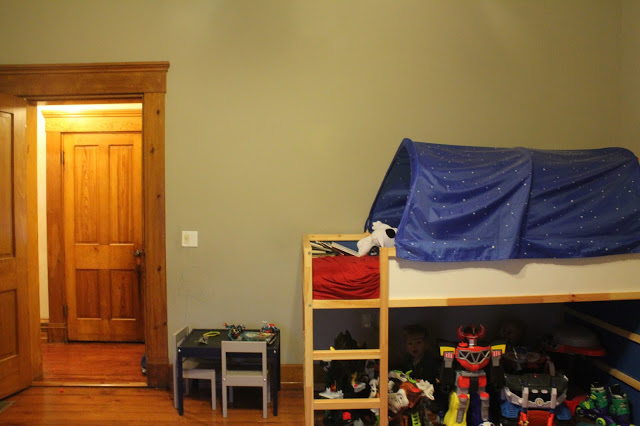
So it became Cormac's toddler room. All we did at the time was paint the walls a medium gray, then insert kid stuff.  Done.  I didn't hang anything on the walls or buy anything fancy.
Cormac's toddler room for several years.      
Finally, last October we decided we were ready to begin transforming this room into an en suite master bathroom with closet.  So Cormac, now a five year old, moved to his new "big kid room" and we started turning our master bath dreams into a reality.

I knew the kind of bathroom I wanted:  Victorian, yet updated.  Marble.  Black + white.  Simple, yet glam.  Vintage vibes.  (I posted our inspiration photos here.)

That was early November of 2016.
Fast forward (wait, maybe not fast) eight months.
Yes.  Eight whole months.

We are finally done!

At long last, here is the transformation.  We are pretty excited to have a shower, a real closet instead of just clothing racks in our bedroom, and even a separate toilet room.  Honestly, it is missing the necessary art + plants needed to make it truly feel like home to me...but you can sense the general vibe in the before + after photos below!
Kept the original tile, fireplace mantle and heart pine floors.  Painted all the trim and picture rails white.
Yeah, the steam shower is a bit over-the-top...but we love it!
We widened the doorway into our bedroom and added pocket doors.  The other door leads to toilet room.
light fixtures from overstock.com
Black vanity was a cheap antique find that I painted black.  Furry stool from Target!
All hardware in room is from Signature Hardware.  Countertop is quartz.  Giant gold mirror was a random vintage find I purchased three years ago -- one of my favorite parts of the bathroom!
terribly lit photo...but our closet is from EasyClosets.com - installed by Hubby!

View looking out from closet.  We kept the closet open on top to let in more natural light.

One more look back at how far we've come...

If it seems completely unrecognizable...well, good! :)

We still need : shutters, plants, art...but, as with all things in our home, it will happen in time.  I find my style evolves over time anyway, so it is best for us not to do everything all at once.

We are glad to be done with this really drawn-out project.
Happy to have cash-flowed the entire thing (our most expensive home reno project so far.) 

Now, onto turning our former bathroom into a cozy little nursery for the baby!

Friday, November 4, 2016

master bathroom inspirations.

I am beyond excited about our master bathroom renovation.  

While I cannot control when contractors show up or the amount of drywall and brick dust that will eventually cover my entire house, I can dream about the design and pore endlessly over the tile and fixtures.

I've had a Pinterest board dedicated to this project for several years.  Years, people.

Yes, we moved in our home in 2012, and the plan was always to turn the large bedroom adjacent (as in literally joined by a door) into our master bathroom.  The bathroom we have been using since moving in, right next to our bedroom, is an okay size but would be a struggle to do two sinks and we definitely would be would have to keep the shower/tub combo.  

Plus, we do not have ANY closet at all.  We have been simply using cheap freestanding clothing racks since moving in. I'm not a diva, and it has been certainly not that big of deal.

But...our dream for the "dream home" has been to have a "dream bath" and "dream closet" (or just a closet) someday. 

Friends - that day is finally upon us!

When looking through my Pinterest inspirations, I decided that these six images give the best insight into my design scheme.  I want mostly black and white, with some warm woods, and a mix of metallic finishes : oil-rubbed bronze and antique gold.   Subway tile, hex tiles, 

I want industrial, vintage, historic, simple, and fabulous.

Also...lots of plants.  But those will come later!

I am not 100% what the finished product will turn out like, as in some ways we are designing as we go, but I am hoping to somehow capture the vibe of these inspirations...
apartmenttherapy

What I love : mix of subway tile and penny floor tile, black and white, touch of brass (Hubby hates brass) and, of course, the plants bathed in natural light!

apartmenttherapy

What I love : that floor tile, the clawfoot, and I am strongly considering painting our trim a bold black!  What?!?!  Gotta get hubby on board...

dustjacketattic

What I love : the black and white of it all!  The plants, the window, and fabulous chandelier are also amazing.

house beautiful

What I love : the shower panes, the niches, the tile work, and the size of this gorgeous shower!

thedesignfiles

What I love : the ceiling medallion, the tub in front of Victorian fireplace, and that wide plank pine flooring looks exactly like what we have in there now.  I am hoping it is salvageable after this project!

So those are my favorites, but you can check out the rest of my board here - so much eye candy!

What would your dream bathroom look like?  

Friday, January 22, 2016

the renovation : the master bath begins! ('before' photos + inspirations)

The time has finally come.  We have lived in 'the dream home' (a Victorian fixer-upper built in the 1850's) for over three years, and it has always been in our minds to transform the bedroom adjacent to our master bedroom into a big, beautiful bathroom.

When we bought the place the room looked like this:
Both the master and this adjoining bedroom were blue.  The blue was a little depressing for us...so we painted them gray immediately.  Because gray is not depressing.  Obviously.
When we eventually moved in, after selling our previous home, the room became the Cormac's nursery. Well, baby boy is now four, and the room has transformed into a giant toy wonderland!  
this room has had lots of playtime in it!  
We have done nothing but paint the walls in this space - there is a lot that needs to happen cosmetically and structurally to transform it.  It is so dingy and dark!
that is a LOT of toys under that IKEA bed...and do you spy a blondie or two?
I never even put anything on his walls, because I have always had in my mind this was a temporary "boy room."  Three years later...
Now that we have two babes (and they are actually no longer babes but rambunctious kiddos) we are finally mentally ready for him to move to what has been referred to for years as "Cormac's future room" -- currently a guest bedroom.  
It is time!  Time for the master bath reno to start! Ah!  Pretty darn excited. 
We had been struggling with the layout for many months, and finally we brought in professional help.  Thankfully, our designer came up with a layout that made much more sense than any of our ideas, so we are gonna go with that.

In the end, hopefully, we will have a space that is light, bright, functional + stylish.  
Here are a few inspirations that best represent the vibe I am hoping for in the space...
//housebeautiful//
I am clearly a sucker for black and white - and yet I want to keep the historic charm in certain elements. Ceiling medallion, chandelier, ornate clawfoot, original hardwoods are some of the ways I hope to achieve that.  I'm sure we will end up with some sort of subway tile in there.  I am sort of a freak for the subway tile. 
//thedesignfiles//
I really love the eclectic vibe of the bathroom below, with the tile,  mismatched wood, mixed metals, and of course the subway tile shower!
//mydomaine//
Our wishlist:
  • clawfoot soaking tub
  • spacious shower
  • separate toilet room (!!!!)
  • walk-in closet 
  • double vanity
Seems reasonable for the space.

Now the budget is another story.  To have it fully contracted out we were quoted a whopping 50K. OMG.  Now, that may be on the high end for an estimate, but still.  We will not be spending 50K.  

Hubby is going to have to work some serious magic on this one.  (aka do the electric and plumbing and tile work himself. Or everything.)

We'll see what happens.  If there is one thing I have learned throughout this renovation journey is that while everything takes at least three times as long as you expected, patience truly pays off.  You end up with something that you love, that fits your style, and hopefully didn't make you go broke.

I'll keep you updated on the progress of this space as we go along!

What projects are you working on in your home? 
 Anyone who has survived a major bathroom reno, I am open to advice and encouragement! :)

Tuesday, April 12, 2011

before and after: bathroom!

Our tiny bathroom redo is finally done!
Well, for now.


I have been waiting impatiently excitedly for us to be able to move into our master suite {previously used as a guest suite} so that we can make room for Baby's nursery in our former bedroom.  (Click {HERE} to check out the sweet little space we used to dwell.)
Because our house is very old, and previous owners put value in having a full bathroom attached to all bedrooms, all the bedrooms and aforementioned bathrooms are, well, tiny. The solution?  Ikea!  
*birds sing, heavens part*

I welcome any excuse to drive the 30 miles to Ikea with Hubby...
and our tiny bathroom redo was the perfect excuse!
It is where we found this beautiful, modern vanity cabinet...

...and these sinks and faucets!

Ikea such a great place to find stylish, small-space solutions at a fabulous price...
and Hubby and I love saving cash where we can.

So what did we do for $1500?
1. Moved plumbing in order to accomodate a double sink vanity.
2. Moved electrical and added outlets.
3. Installed new, gigantic mirrored medicine cabinets 
4. New light fixtures
5. Painted walls

{disclaimer: all labor done by Hubby...with help on the electrical from the Mustache Man. :o)  Thanks Rickster!}

before: tan walls, tiny sink space

after: rearranged space and cool blue-gray walls

before: no storage space

after: storage in mirrored cabinets, deep cabinet drawers, and hidden baskets underneath!
{click HERE to check out inside the medicine cabinets -- so great!}

before: 

after:
{excuse the missing baseboard...these are getting replaced!}
before: wasted space!
after: utilized space!

before:


after: 
{hoping to one day make this a tiled shower with glass enclosure...a girl can dream!}
{found this cute rug and storage baskets at Target}

Someday we will re-tile the floor and shower -- gotta save up some more cash!
Happy for now with the updated space...

How have you made your "house" your "home" lately?

G