

Disclaimer: I am not crafty.
I am not even particularly thrifty.
I am a "see something cute and buy it" girl.
My story begins while perusing Target the other day, when I saw some kitchen canisters on display that made my heart skip. They were white ceramic, with white ceramic lids, and black numbers painted on the front: 1 2 3.
I thought they were really cute and simple and would look darling in my kitchen, and before I knew it I was plopping them into my red basket. Then my brain caught up with my impulse-shopping heart, and I saw the price tag. The three sizes ranged from $12-$20. I realized my cash-only budget would not allow this splurge.
{Darn you, Dave Ramsey! Just kidding. I love you.}
Then the wheels in my head really started turning (almost audibly: creak, creak, creak...) and I looked at the canister and thought: This can't be that hard to replicate. Even a DIY-dummy like me might be able to do it!
So off I ran to the thrift store and scanned the shelves in the kitchen items section for eligible candidates. After eliminating several hideous doozies , I found these:

No idea what year they are from, but I could see potential. Simple white ceramic, with metal lids and removable hardware. Oh, and how much did I pay?

79 cents each!!! I had died and gone to thrift store heaven. So to recreate my coveted Target canisters, here is what I did:
1. Removed the silly stickers from the fronts. Easy.
2. Unscrewed the hardware from the lids. Despite the rust: Easy!

3. Washed the canisters and lids to start off clean!

4. Painted the lids. I actually loved the copper color of the lids, but my kitchen has not one speck of copper in it, and they were uber-rusty, so I whipped out my magical can of black spray paint and sprayed them a lovely classic black, hiding any rust. Luuurve spray paint.

5. Added new silver knobs to the lids -- to go with my stainless-steel-clad kitchen. Used a Home Depot gift card I stole from my hubby, so they were sort-of free. :o)

6. Chose a font style on my computer {American Typewriter} and printed out the numbers. I actually printed them each on a separate sheet, but you get the idea.
7. Used a craft knife to {very carefully} cut out the numbers. As I said, I am neither patient or good with details, so this was the crappiest part of the process for me...

8. Placed the number stencil where I wanted it on the canister, then taped it in place.

9. Next I spray-painted the numbers outside in the grass with a drop cloth. When I removed the stencils I was a little concerned -- it looked a little scary!

So before I had a panic attack I touched up the white spots with a q-tip full of spray paint, and then used my fingernail wrapped in paper towel to meticulously touch-up the numbers and wipe away the excess paint.
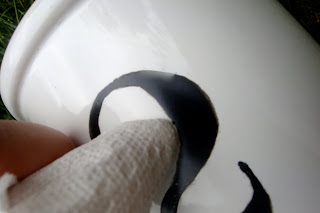
This
was
agonizing....
I couldn't get them to be perfect, but I decided a little imperfection never hurt anything. I still think they are fabulous and worth the time, effort, warm-and-fuzzy sense of accomplishment. I spent about 1 1/2 hours working on these canisters. I spent less than $3. Cash {thank you Dave Ramsey.}
My thrift store canisters went from this:

To my black and white, modern version:


Now where shall I put them?
Decisions, decisions, {fun} decisions!
Wishing you thrift-store dreams, and a very lovely almost-Friday!
PS: I am linking this to another sweet blog called House of Thrifty Decor -- check out her "Show Off Sunday Party" for more lovely ideas!

Very cute! It doesn't have to be perfect and sometimes it's fun to have a little quirk. Good example: http://www.thenester.com/2010/09/chalkboard-fireplace-surround-a-year-later.html
ReplyDelete~Christi
I love your craftswomanship!! You go girl :o)
ReplyDeleteBeautiful! - Thania
ReplyDeleteI love it Greta! I would've never thought to do that! Your optimism and craftiness are very inspiring.
ReplyDeleteI SAW THOSE AT TARGET TOO! I made Ben stand there and stare at them with me as we coveted things we can't afford. YOU DID SUCH A GOOD JOB! I want to copy cat this project REAL bad. I have to large glass ones already that I don't "dislike" i wonder if I could just paint numbers on those?
ReplyDeleteThanks for the inspiration sis!
Very cute! They look so much better.
ReplyDeleteI know that you don't know me, but I saw your link on TDC. And I love what you did with the containers!!! I was so inspired and totally want to copy you! Thanks for posting!
ReplyDeleteADORABLE! I LOVE these! They look JUST like some that they have at Target right now -- they turned out great!
ReplyDeleteI love your new canisters. I saw the same ones at Target, and wanted them as well. But my husband didn't agree that they were as fabulous as I thought they were. You gave me great inspiration to make my own.
ReplyDeleteI hope you can stop by my blog today for my Show Off Sunday Party. I would love for you to share this project with my followers and inspire them.
http://houseofthriftydecor.blogspot.com/
I saw the same canisters at Tarjay. I was in love, too, but not in love with the price. I thought about trying to recreate them like you. Nice to see how well they turned out. I like the black lids. Great job!
ReplyDeleteLove it! We went to Goodwill today and I couldn't find anything that exciting.
ReplyDelete